Showing posts with label collection. Show all posts

Friday, 8 August 2014

How to Add Meta Description to Blogger Blog in Easy 4 Steps

Recently Blogger made it very easy to implement Meta description in blogs. And every blogger user is trying to figure out how to use meta description properly in their blog. Just writing a post quality post is not enough for having blogging success. You also have to provide information to search engines about you blog and meta description is the way to do that.

Meta description is an HTML or XML element which tells search engine's crawler about the webpage. Plus it is also picked us as snippets in search result and as description when you share the post on Google+, Facebook, Twitter and other social networks.

If you properly write a meta description; chances are you post will be in top of the search results and more visits via social medias. So you can understand why it is very important for your blog. Most importantly it is a vital tool for SEO(Search Engine Optimization). Introduction of this has made the blogger blog’s more SEO and user friendly.

Before giving the instructions; on behalf of every blogger user, I would like to express our thanks and appreciations to Google and Blogger Developer Team for introducing meta description in the blogger.
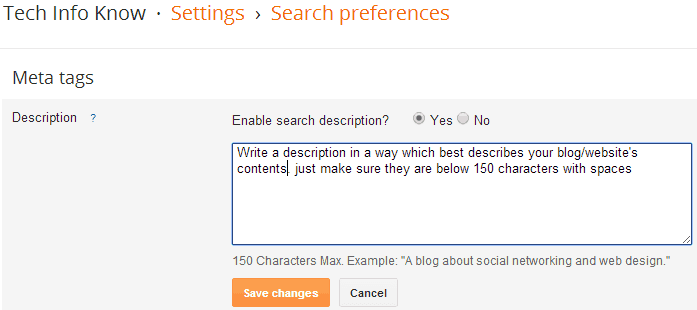
Step-1: Enable Meta Description for Blogger by Adding Meta Description for Home Page

First we need to enable meta description for blogger by adding one for home page of the blog. Follow these steps;
  1. On your blog's Dashboard; go to your Settings > Search preferences > Meta tags > Description and click the Edit link.
  2. Click the 'Yes' radio button.
  3. Enter the meta description for your blog. This will appear on your homepage and other multi-post pages.
  4. Click 'Save Changes' button.
Add Meta Description to blogger blog
You have successfully enabled meta description for your blog and added a new meta description for you blog's home page.

Step-2: Adding Meta Description to Each Blogger Posts and Pages

Adding Meta Description to Each Blogger Posts and PagesAfter doing the above you will see some change in your post or page editor. You will see a search description option. So; for adding meta description to each blogger posts and pages follow these steps:
  1. On blogger dashboard click 'Posts'; then select a post to edit or create a new post. For adding meta dashboard in a page go to 'Pages' tag and select a page to edit or create a new one.
  2. Click on 'Search Description' option under Post settings. It will not appear unless you have followed and executed Step-1.
  3. Enter the meta description for the post and click 'Done'.

You have to go edit each post manually for adding meta description in older posts.


Step-3: Check if it's working

There are many online tools for checking meta description of webpages but you should follow the most simple tool ever; which is checking the source code of the webpage. Go to your blog's any page or any posts page; right click and you will find an option similar to 'View Page Source' and click it. Or Most easy way just hit "Ctrl + U" in your keyboard.
Now search for your meta description. Hit "Ctrl + F" in your browser and paste the description you entered. Or, look for something like this;
<meta content='....your description....' name='description'/>
If you found it everything is alright; if not follow the Step-4 below.

Step-4: If the Blogger Meta Descriptions not Showing

If the meta description is not showing then;
  1. Go to Blogger Dashboard > Template; click 'Edit Template'.
  2. Find <b:skin> <![CDATA[ and paste the following code just before it.
    <b:if cond='data:blog.metaDescription != &quot;&quot;'>
    <meta expr:content='data:blog.metaDescription' name='description'/> 
    </b:if>
  3. Click 'Save template'.
Now check again(repeat step-4) for meta description. It should work and you will find you meta description. If you are adding meta description in your blog’s older posts; it will appear immediately in the source code but will take some time to appear on the search results. Your meta description should be concise and accurately describe the resulting page.

Hope this post helped in your quest of doing SEO for your blogger blog. Have question or suggestion; please do comment and don’t forget to share this information.
Source: http://www.techinfoknow.com/2014/04/blogger-meta-description.html

New AJAX Navigation Menu Widget for Blogger

After so long time almost two months, i am here with awesome new blogger widget. It is very hard to manage the works and blogs simultaneously. But still love to give the new blogger widgets and tips.
AJAX Navigation menu for blogger is very new widget created by Me in Blogger platform that uses Blogger JSON feed API and AJAX. This navigation menu is inspired from Mashable.com old site. I coded this widget some months ago, but there is no time for publishing this article. And now i recoded and improved this widget and added customizable features.

How it Works ?

Well, this widget is works based on jQuery library and Blogger JSON feed API. Your blog must be for Public visitors. other wise the Blogger JSON Feed API won’t works.
The menu is works just like normal drop-down menu when javascript is disabled, And it will turns to AJAX powered drop-down menu when javascript is enabled.
AJAX Navigation Menu For Blogger Banner
View Demo

How to Install this Widget?

  1. Go to Blogger Dashboard > Select the Blog > Go to Template page of the Blog
  2. Click Edit HTML button

The CSS

Add the Following CSS Code before ]]></b:skin>
/* Menu Stylings */
.w2bmenu *{margin: 0;padding: 0;}
ul.w2bmenu {list-style: none;line-height: 1;overflow: visible !important;}
ul.w2bmenu:after{margin: 0;padding: 0;content: ' ';display: block;height: 0px;clear: both;}
ul.w2bmenu li{list-style: none;position:relative;float: left;margin: 0 !important;padding: 0 !important;}
ul.w2bmenu li a{margin: 0;padding: 12px 16px !important;font-family: 'Helvetica Neue', Arial, Helvetica, sans-serif !important;color: #6b6b6b !important;text-shadow: 0 1px 0 #fff;font-weight: 700 !important;text-transform: uppercase !important;font-size: 12px !important;display: block !important;border: 0 none !important;}
ul.w2bmenu li a:hover,ul.w2bmenu li a.hoverover{background: #f5f5f5 !important;}
ul.w2bmenu ul{position: absolute;display: none;top: 100%;border:1px solid #ccc;}
ul.w2bmenu li:hover > ul{display: block;}
ul.w2bmenu ul li{float: none;min-width: 160px;background:#f5f5f5;text-shadow: none;}
ul.w2bmenu ul li a{padding: 12px 14px;text-transform: none;font-weight: normal;}
ul.w2bmenu ul li a:hover,ul.w2bajaxmenu ul li a.hoverover{background: #fff !important;}
ul.w2bmenu ul ul{display: none;left: 100%;top: 0;}
/* AJAX Menu Stylings */
ul.w2bajaxmenu li div.submenu {display: none;position: absolute;width: 600px;z-index: 90;left: -1px;top: 100%;overflow: hidden;min-height: 150px;background: #fff;border:1px solid #cccccc;border-top: 0 none;}
ul.w2bajaxmenu li:hover div.submenu {display: block;}
ul.w2bajaxmenu ul ,ul.w2bajaxmenu ul li{display: block !important;border: 0 none !important;margin: 0 !important;padding:0 !important;}
ul.w2bajaxmenu ul li{background: none !important;float: none !important;}
ul.w2bajaxmenu ul.verticlemenu{position: absolute;width: 33%;left:0;top:0;bottom: 0;background: #f5f5f5;}
ul.w2bajaxmenu ul.postslist {position: relative;display: block;width:65%;float: right;margin: 8px 0 !important;background: none;}
ul.w2bajaxmenu ul.postslist li{display: block;overflow: hidden;border-bottom: 1px #eee solid;position: relative;min-height: 60px;padding: 8px 8px 8px 110px !important;}
ul.w2bajaxmenu ul.postslist li:last-child{border-bottom: none 0;}
ul.w2bajaxmenu ul.postslist li .imgCont{position: absolute;left: 0;top:8px;width: 100px;height: 60px;overflow: hidden;border:1px solid #dcdcdc;font-size: 0;line-height: 0;}
ul.w2bajaxmenu ul.postslist li .imgCont img{position: relative;top:-20px;padding: 0;width: 100px;height: 100px;display: block;}
ul.w2bajaxmenu ul.postslist li a{display: block;line-height: 1.4;padding: 0 !important;}
ul.w2bajaxmenu .loader{background:url('http://i.imgur.com/SeivG.gif') no-repeat scroll 0 0 transparent;width:22px;height:22px;position: absolute;top:50%;margin-top: -11px;right:5px;}
ul.w2bajaxmenu .menuArrow {border-bottom: 4px solid transparent;border-top: 4px solid transparent;border-left: 4px solid #999999;display: block;height: 0;margin-top: -4px;position: absolute;right: 11px;top: 50%;width: 0;}
#w2bajaxmenu {background: #ededed;background: -moz-linear-gradient(top, #ededed 0%, #e0e0e0 100%);background: -webkit-gradient(linear, left top, left bottom, color-stop(0%,#ededed), color-stop(100%,#e0e0e0));background: -webkit-linear-gradient(top, #ededed 0%,#e0e0e0 100%);background: -o-linear-gradient(top, #ededed 0%,#e0e0e0 100%);background: -ms-linear-gradient(top, #ededed 0%,#e0e0e0 100%);background: linear-gradient(to bottom, #ededed 0%,#e0e0e0 100%);filter: progid:DXImageTransform.Microsoft.gradient( startColorstr='#ededed', endColorstr='#e0e0e0',GradientType=0 );border: 1px solid #cccccc;}

The JavaScript

If your Blog has jQuery plugin, then don’t add this plugin in your blog template,
Otherwise add the below line of code before  </head> tag
<script type="text/javascript" src="http://ajax.googleapis.com/ajax/libs/jquery/1.8.2/jquery.min.js"></script>
Add the following Javascript code before  </head> tag
<script type="text/javascript" src="http://widgets.way2blogging.org/blogger-widgets/ajaxbloggermenu.min.js"></script>
<script type="text/javascript">
jQuery(document).ready(function($) {
	$('#w2bajaxmenu').ajaxBloggerMenu({
		numPosts : 4, // Number of Posts to show
		defaultImg : 'http://url-to-image.com/default-image.jpeg' // Default thumbnail Image
	});
});
</script>

The HTML

In this section you should be carefully add the HTML, otherwise it won’t works.
The AJAX Menu accepts three types of urls. You must use this urls only in the menu. They are Label, Search Query and Label w/ Search Query.
Label URL http://yourblogdomain.blogspot.com/search/label/LABELNAME
Search Query http://yourblogdomain.blogspot.com/search?q=SEARCHQUERY
Label w/ Search Query http://yourblogdomain.blogspot.com/search/label/LABELNAME?q=SEARCHQUERY
Note:- Search Query must be Url encoded. You can use this tool to encode your search query.
Use this MENU Example code and add it in HTML/JavaScript gadget.
<ul id="w2bajaxmenu" class="w2bmenu">
	<li>
		<a href="#">Home</a>
	</li>
	<li>
		<a href="#">Example 1</a>
		<ul>
			<li><a href="http://yourblogdomain.blogspot.com/search/label/AdSense">Sample Label</a></li>
			<li><a href="http://yourblogdomain.blogspot.com/search/label/Gadgets?q=harish">Label w/ Search</a></li>
			<li><a href="http://yourblogdomain.blogspot.com/search?q=way2blogging">Search Query</a></li>
			<li><a href="http://yourblogdomain.blogspot.com/search?q=This+is+long+query+you+do+not+get+any+results,+so+try+others">Unknown Search</a>
		</ul>
	</li>
	<li>
		<a href="#">Example 2</a>
		<ul>
			<li><a href="http://yourblogdomain.blogspot.com/search/label/Design">Design</a></li>
			<li><a href="http://yourblogdomain.blogspot.com/search/label/Facebook?q=Like+Button">Facebook</a></li>
			<li><a href="http://yourblogdomain.blogspot.com/search/label/Templates">Templates</a></li>
			<li><a href="http://yourblogdomain.blogspot.com/search?q=Guest+Posts">Guest Posts</a></li>
		</ul>
	</li>
	<li><a href="http://yourblogdomain.blogspot.com">Normal Link</a></li>
</ul>

Final Words!

I hope you enjoyed with this widget. I am really sorry for not posting new gadgets and templates regularly. I hope i will continue release new templates, widgets and tips. :)
Suggest new features, your feedback and your thoughts on this widget by leaving a comment and don’t forget to share this widget
OG URL :http://www.way2blogging.org/2012/12/new-ajax-navigation-menu-widget-for-blogger.html

Mashable Style Blogger Horizontal Navigation Bar

Mashable dropdown menus are more popular and familiar widget for any platform, which includes thumbnails of each individual post also hyperlinks, description, search box, login form and more options. Look like the mashable style the widget is possible to download for WordPress but in blogger it's quite impossible to download form any source until or unless any developer makes it. But we're so proud releasing a jQuery based menu bar which not like to Mashable style but it creates a multi-level dropdowns like as mashable also a load icon appears when users just put the cursor on any navlinks. Today we'd show you all how to install this widget properly on Google hosted blogspot templates easily.

Prepare Your Template First

1. Go to Blogger > Template
2. Backup Your Template
3. Click Edit HTML
4. Now search for </b:skin>
5. Simply add the following code right before closing </b:skin>  tag
/* Menu Stylings */
.w2bmenu *{margin: 0;padding: 0;}
ul.w2bmenu {background: #36b3ff; height:41px; width:960px; margin-bottom: 0px; margin-top: 0px; }
ul.w2bmenu:after{margin: 0;padding: 0;content: ' ';display: block;height: 0px;clear: both;}
ul.w2bmenu li{list-style: none;float: left;position:relative;margin: 0;padding: 0;}
ul.w2bmenu li a{margin: 0;padding: 13px 16px;text-decoration:none;font-size: 11px;
font-family: Arial,Helvetica, Verdana;
font-weight: normal;
text-transform: uppercase;text-shadow: 0px 1px 1px #888;color: #fff;display: block;
border-right: 1px solid #84d1ff; }
ul.w2bmenu li a:hover {
color: #fff;
}
ul.w2bmenu li a:hover,ul.w2bmenu li a.hoverover{background: #57c0ff;}
ul.w2bmenu ul{position: absolute;display: none;top: 100%; }
ul.w2bmenu li:hover > ul{display: block;}
ul.w2bmenu ul li{float: none; min-width: 160px;background: #76cbff; text-shadow: none; color: #fff; font: normal 12px tahoma, verdana;}
ul.w2bmenu ul li a{padding: 12px 14px;text-transform: none;font-weight: normal; letter-spacing: 1px;}
ul.w2bmenu ul li a:hover,ul.w2bajaxmenu ul li a.hoverover{ text-decoration: none; }
ul.w2bmenu ul ul{display: none;left: 100%;top: 0;}

/* AJAX Menu Stylings */

ul.w2bajaxmenu li div.submenu {display: none;position: absolute;width: 600px;z-index: 90;left: -1px;top: 100%;overflow: hidden;min-height: 150px;background: #3f3f3f;border-top: 0 none; color: #fff;}
ul.w2bajaxmenu li:hover div.submenu {display: block;}
ul.w2bajaxmenu ul {display: block !important;border: 0 none !important;}
ul.w2bajaxmenu ul li{background: none !important;}
ul.w2bajaxmenu ul.verticlemenu{position: absolute;width: 33%;left:0;top:0;bottom: 0;background: #212121;}
ul.w2bajaxmenu ul.postslist {position: relative;display: block;width:65%;float: right;margin: 8px 0;background: none;}
ul.w2bajaxmenu ul.postslist li{display: block;overflow: hidden;position: relative;min-height: 60px;padding: 8px 8px 8px 110px;}
ul.w2bajaxmenu ul.postslist li:last-child{border-bottom: none 0;}
ul.w2bajaxmenu ul.postslist li .imgCont{position: absolute;left: 0;top:8px;width: 100px;height: 60px;overflow: hidden;border:1px solid #c7c7c7;font-size: 0;line-height: 0; border-radius: 6px;
opacity: 0.5;
}
ul.w2bajaxmenu ul.postslist li .imgCont:hover {
opacity: 1;
}
ul.w2bajaxmenu ul.postslist li .imgCont img{position: relative;top:-20px;padding: 0;width: 100px;height: 100px;display:}
ul.w2bajaxmenu ul.postslist li a{display: block;line-height: 1.4;padding: 0;}
ul.w2bajaxmenu
.loader{background:url('https://blogger.googleusercontent.com/img/b/R29vZ2xl/AVvXsEjQaPeG1O8ennzMrtsIMzDjxMxI1RtYvm9PXHujN8scBOMhvZq9yewXwPCkct52eI5qFLl_pw7sgsagKGzonPRxZ0YB9-qtndSuWT7KEekwWtK5YAPDrolR2VHjtqinwXKP0INn0KEmqfxD/s320/SeivG.gif') no-repeat scroll 0 0 transparent;width:22px;height:22px;position: absolute;top:50%;margin-top: -11px;right:5px;}
ul.w2bajaxmenu .menuArrow {border-bottom: 4px solid transparent;border-top: 4px solid transparent;border-left: 4px solid #999999;display: block;height: 0;margin-top: -4px;position: absolute;right: 11px;top: 50%;width: 0;}
6. Don't save your template yet search for </head>
7. Now add the following jQuery script right above closing </head> tag
<script src='https://ajax.googleapis.com/ajax/libs/jquery/1.8.3/jquery.min.js' type='text/javascript'></script>
<script src='http://snippethosted.googlecode.com/svn/ajaxbloggermenu.min.js' type='text/javascript'></script>

<script type='text/javascript'>
jQuery(document).ready(function($) {
            $('#w2bajaxmenu').ajaxBloggerMenu({
            });
});
</script>
8. Finally save your template and you're done!

How To Embed The Bar

  1. Go to layout section
  2. Click on Add a Gadget
  3. Choose HTML/JavaScript
  4. Now copy and paste the following code inside textarea of the widget
  5. Finally save the widget and right place it according to your template structure
<ul id="w2bajaxmenu" class="w2bmenu">
        <li>
            <a href="#">Home</a>
        </li>
        <li>
            <a href="#">Example 1</a>
            <ul>
                <li><a href="Label URL1">Sample Label</a></li>
                <li><a href="Label URL2">Label w/ Search</a></li>
                <li><a href="Label URL3">Search Query</a></li>
                <li><a href="Label URL4">Unknown Search</a></li>
            </ul>
</li>
        <li>
            <a href="#">Example 2</a>
            <ul>
                <li><a href="Label URL1">Social Media</a></li>
                <li><a href="Label URL2">Make Money</a></li>
                <li><a href="Label URL3">Affilliate</a></li>
                <li><a href="Label URL4">Portfolio</a></li>
            </ul>
        </li>
        <li><a href="http://www.way2blogging.org">Blogger</a></li>
        <li><a href="http://www.genesisawesome.com">WordPress</a></li>
    </ul>

Customization Guidance

  1. Simply change light blue colored Example 1, Example 2 as the main-menu links
  2. Expand the bar up-to 100% by changing the widget 960px;
  3. Change the Label URL1, Label URL2 as the label URL and Sample Label, Search Query as the exact label title

Credit Goes:

We proudly say that this script is generated and optimized by Harish Dasari (Author and admin of Way2blogging.org) we just brought changes into its css part. Now it perfectly works for any blogspot template. I think it will not create any trouble until or unless your bring any changes into its JavaScript part. If you wish to optimize it more then kindly contact us at info@thewildblogger.com we'd definitely help you to do so.

Tutorial Overview:

If you wish this tutorial helpful then you kindly support us grab our button on right column or subscribe our regular email updates or you may send your feedback through our comment form directly.

Do safe blogging :)
Original Post at : http://www.thewildblogger.com/2012/12/mashable-style-blogger-horizontal.html